Thursday, August 31, 2017

My Flower Garden Tour 2017, Part 1: Perennials


 Tomorrow is only the first of September, but Fall has arrived early this year to Northern Indiana! This past week's weather has been unseasonably cold for the end of August and tomorrow the forecasted high temp is only 68 degrees! Yikes! Perhaps I jinxed us in my last post when I said that we usually have several weeks of good weather left!

Today, I am posting pics of all my glorious flowers from this year before they bite the dust! I feel like even my flowers are sensing that Fall is near because they are subtly starting to fade away. So let's take a tour of my flower gardens before that happens!

I had a pretty good season for flowers this year. Things I thought didn't survive last winter made a surprise appearance late in the season and even my first year Dinner Plate Hibiscus bloomed! I started a new garden, added to my existing ones, and have decided to revamp all of my front porch landscaping next year. In fact, I've already started adding to it with a couple of clearance plants!

I'm going to break this down into two posts since I have so many flowers! Perennials and Annuals. We'll start with the Perennial plants first, which come back every year (hopefully!) 

First up is my new fave, the Hardy Dinner Plate Hibiscus!
 
I didn't know what to expect when it bloomed. I knew it was a red and pink combo of some sort, but there are several different kinds. I was pleasantly surprised!

This is my favorite picture ever!

It brings a touch of tropical Hawaii to my Midwest garden! Be sure to get the ones labeled hardy if you live in a non-tropical climate.


Next up are my Hydrangeas, beginning with my favorite, the Limelight Hydrangea. 


This was from this Spring when it first started to bloom. It's my favorite stage because of the bright lime green color.

Then they turn white and fluffy!

This sucker is so huge! I got this plant at Main's Flower Garden for half off (only $10!) probably 6-7 years ago. The first year, I misread the directions and cut it off almost to the ground! I thought I'd lose it! But it came back better than ever! It's now bordering on being too big for it's spot.

Here is the Limelight Hydrangea today. It's already starting to turn a dusty pink around the tips for Fall!
 
This was my Bloomstruck Hydrangea a few months ago. It's a beautiful purple color. I was about to dig it up because I thought it was dead due to a late frost when all of the sudden this tiny sprout appeared.

This is the Bloomstruck today! A flower bud has appeared! Better late than never! This winter I will definitely be protecting it better!

This is my shade garden area. On the far left is my pink Let's Dance Diva Hydrangea. It too barely survived the late frost, but it's come back nicely! My transplanted Hostas sure have thrived in the shade garden too! I'm on the lookout for more shade loving plants to fill in the rest of the garden here.

This is a fully bloomed head of the Let's Dance Diva. It's a little strange, but still very pretty. The little pink buds in the middle don't get the big flowers on them.


These are purple Balloon Flowers, aka Platycodon. The unbloomed flower at the top resembles a balloon, hence the name! They don't really spread much from year to year, so I will be getting more next Summer.

This is a new plant for 2017, a Spiderwort. I planted it in the shady creekside garden, but I may move it next year if it needs more sunshine.

After seeing the Bleeding Hearts at Foster Park this year, I had to get one for my creekside garden!

My most recent purchase was this Black-Eyed Susan and the Echinacea in the next picture. They are front and center in my new garden area around my garage.

This is Echinacea, otherwise known as Coneflower. I only fell in love with them this year!

My new garage garden area is looking good!

This Wisteria is a new plant this year too! (I am only just now realizing how many plants I actually bought this year as I write this post! I can't help it! I love them!) I planted it in a pot since I am unsure where it's forever home will be just yet. They are known to grow like crazy, so I have to find just the right spot! Hopefully it will come back next year!

One plant that will not be coming back next year is my Chinese Lantern plant. I love the orange lanterns it produces, but it has gone wild and completely taken over my garden! I can't ever just seem to throw plants away so I may see if I can re-home it elsewhere in the yard, but we shall see!


Stay tuned for Part 2 of my 2017 Flower Garden Tour ~ The Annuals!


Thursday, August 24, 2017

All Decked Out!


 Although Summer is rapidly coming to a close, today I am sharing my back deck in all it's Summer glory! Here in Northern Indiana we usually still have several weeks - if not even months - of beautiful weather left, so there is still plenty of time to enjoy deck time.

This year, I did just a few little things on my back deck to make it a little more summery, welcoming, and cozy. I didn't (couldn't) spend a lot of money or time, and it turned out wonderful. It's exactly what I was going for!

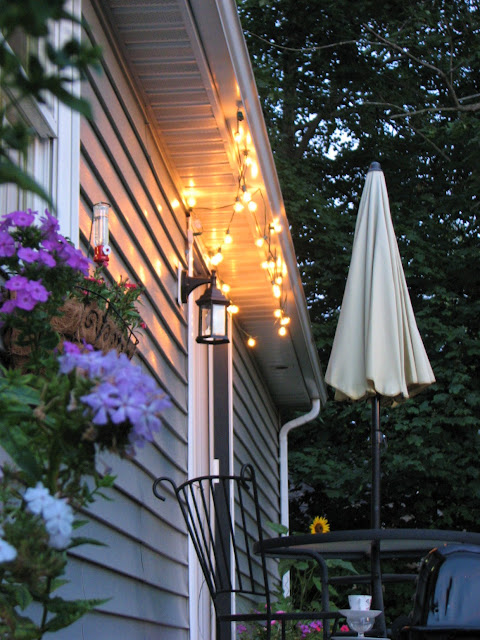
At the first sight of summer around here, up goes our green patio umbrella! We got our cute little patio dining set at Menards several years ago for less than $100! It has served us very well! It came with four nice chairs, a table, and the umbrella. It's living proof that you don't need to spend a lot of money to make your house a home!

I have been obsessed with colorful patio lights every since I was little and I have plenty! From pink flamingos and palm trees to multi-colored Chinese lanterns. But, this year, I decided to go clear. I'm really digging Edison Bulbs and all the plain, clear glass globe lights that are so popular right now. They cast such a gorgeous, warm glow and will carry over to Fall nicely. Just make sure to bring them in once the temps drop, otherwise they will break!

I would love a pergola to string my patio lights from, but I like my sunshine more! With nothing much to hang my lights from, I ended up hanging them from the gutters. I used very small 3M Command clips that I got on clearance and they worked like a charm!

This Summer I also decided that I needed a giant planter on my deck, chock full of flowers.  I ended up finding a cheap, large, faux terracotta planter. It was exactly what I had in mind. I filled it with hot pink petunias, white sunpatiens, purple trailing verbena, and a giant corkscrew plant stuck right in the middle! I followed the thriller, filler, and spiller method and it worked like a charm! I also added my tiny lawn flamingo I got in New Smyrna Beach, Florida last year for some extra tropical vibes!

 Although I am more than ready for pumpkins and other Fall decor, I am still not ready to give up Summer and warm, sunny days! I try to spend every minute I can out on my deck soaking up every last ray of sunshine!


Friday, August 18, 2017

Feeding and Attracting Hummingbirds


I love all birds, but my favorite are probably hummingbirds. They are so tiny and cute and very friendly compared to other birds. I have at least three hummingbirds that live in my yard and visit my feeder on a regular basis. 

Here in Northern Indiana we get the Ruby-Throated variety of hummingbirds. The males have a bright reddish-pink patch on their throats and a beautiful green back. The females, like any other bird, are not as pretty as the males. They are usually not as bright of a green and have more brown on them with just a white throat.

Hummingbirds are pretty amazing little creatures. They fly about 27 miles per hour! They are very curious and will buzz right by you, so close that you can almost feel it. Mine also like to watch us almost as much as we like to watch them. Sometimes I will look up and one will be flying stationary and looking in the window at me!

I feed my hummingbirds homemade nectar. You can buy the red stuff at the store, but it's really just so simple and cheap to make it yourself. Plus, there is some debate on whether the red stuff is good for them or not. So I figure, why take the chance? Fresh is always best anyways! Just make sure to always keep a steady supply of food for them and they will keep coming back for more!

All you need to do to make your own nectar is fully combine one part sugar to four parts cold water. That's it! No boiling needed! I have a large feeder so I use 1/2 cup sugar and 2 cups water. These birds like their nectar changed every 3-4 days or whenever it gets cloudy. Mine will tell us when they want fresh!

Also make sure to clean out your feeder each time you refill it. Hummingbirds can get sick and die if the feeder is moldy or too dirty. All we do is rinse it ours out very well with plain old water and wipe off any mold spots. Do not use soaps to clean it as that can make birds sick too.

Almost anyone can get in on the fun of feeding hummingbirds, even if you live in an apartment! I've seen hummingbird feeders that attach to windows or you can hang them from just about anywhere. These birds are very territorial and will keep coming back to the same spot year after year.

Hummingbirds are very friendly and curious creatures. Mine let me get very close to them and they like to buzz us to say hello! I've seen videos of people holding a feeder in their hands and hummingbirds coming right up to them and eating out of their hands. This has happened to my mom once, but not me yet! That's my goal though!

This is one of my female hummingbirds. I have two females and one male (as far as I can tell) that come to my feeder. I see the girls out more than the guy for some reason.

If you have several birds fighting each other off at your feeder, put out another feeder. The more feeders you have, the more birds you will attract.

I just put up a another feeder in my new window box. So far, I've only seen one bird at it once. It will probably catch on better next year. Hummingbirds also feed on flower nectar too.

Hummingbirds like to rest nearby in between feedings, usually in a tree, but sometimes they sit on my tomato cages too! Once, I was gardening and I looked up and came face to face with a hummingbird sitting on a tomato cage. It was pretty cool! We sat there for a little bit staring at each other before it flew off!

This is my male hummingbird. He's a bit harder to photograph. I couldn't get a picture of him head on so you could see his ruby throat, but notice how his back is much more bright green than the females.

Here's a closer picture. They really are very beautiful birds!

Hummingbirds flap their wings about 53 times PER SECOND!

In my area, hummingbirds generally arrive sometime in April and stay throughout Fall. Sometimes birds that are traveling through your area will stop at your feeder on their way to Central America, where they spend the winter.

Happy feeding!


Thursday, August 10, 2017

The Vegetable Garden


My vegetable garden has finally started to take off! We had a very slow start and had to replant a bit, but we've ended up with quite a few things growing! Even things we didn't expect!

Shortly after planting the vegetable garden and cactus seeds we had a major rainout and unfortunately, a lot of my seeds washed away!

My DIY Cactus Garden that was growing in my Jiffy Greenhouse was a complete bust! I left it on my back porch to soak up the sun and all it ended up soaking up was a ton of water. Even with the lid on! I have a feeling that when I dumped the water out, the seeds went with it. Oops.

My vegetable garden also got washed away! Only two pumpkin plants and two (what we thought were) honeydew ended up surviving, along with three sunflowers. None of the cantaloupes came up at all.

 On a positive note, we have tons of full-size cucumbers growing! And no, we didn't plant any cucumbers this year! Or last year even! I honestly think that the honeydew seeds were actually cucumber seeds that were mispackaged.

We did end up getting four already-sprouted Iroquois Cantaloupes from Main's Garden in New Haven during their annual half off sale to replace the seeds. They're doing well so far and flowering, but still no fruit yet. Iroquois is supposedly one of the easiest kinds to grow, so that's good for us!

I'm not mad about all the failures in my garden this year. I'm sure that even Martha Stewart has had her share of gardening mishaps! It's all part of the learning process! For as many failures as we had this year, we've had just as many successes! And I am very excited that my pumpkins are doing so well! I can't wait for Fall!


I had my suspicions when I saw this that it wasn't a honeydew! I've grown enough pickles to know what a cucumber blossom looks like!

The cucumbers are probably doing the best out of everything we planted!

Here's one that's almost ready!

This is one of the Iroquois Cantaloupes that we planted.

Here's a tiny pumpkin just sprouting out of it's orange blossom! I've got several more at this stage right now.

This is the biggest pumpkin so far. They are all the mini pumpkins so it won't get too much bigger than this. I am curious if it's going to be white or orange. It's still too hard to tell at this stage.

This was the poor cactus garden after it's rainout. I may try it again if I can find some more cactus seeds!

Here's one of my beautiful sunflowers!


Thursday, August 3, 2017

Lemon Cheesecake Bars


Lemon is one of my favorite flavors! So when our family reunion came around again last week, I decided to revisit a favorite dessert from my childhood ~ Lemon Cheesecake Bars!

Whenever I am attending a family reunion, potluck, or the like, I always make sure to take something that I absolutely love! That way, if all the other food is nasty, at least I'll have something good to eat! I may or may not have been known to eat all of my own food! And I almost always make a dessert!

These Lemon Cheesecake Bars are delicious and I most definitely could eat them all in one sitting. The lemon flavor is very light, so don't expect to get a major burst of lemon. If you want to pump up the lemon factor, just add a little bit more lemon juice! But, I think they are perfect the way they are! I was always so excited whenever my mom would make them for us! They are truly one of my favorites!

Here are the Ingredients:

1 box yellow cake mix
1 8oz package of cream cheese
1/3 cup sugar
1 tsp lemon juice
2 eggs
1/3 cup vegetable oil


And here's what to do: 

First off, combine the cake mix, 1 egg, and 1/3 cup oil in a bowl and mix until crumbly.
 

Reserve about one cup (I always save back a little more) of the crumbled mix for the topping.
 

Lightly pat the remaining mixture into the bottom of an ungreased 13x9 pan. It's okay if there is a little space in between, it'll all come together when you bake it! 


Bake at 350 degrees for about 15 minutes, or until the edges just begin to brown.

Next, beat together your softened cream cheese, 1/3 cup sugar, 1 egg, and 1 tsp lemon juice. It may be lumpy or look like it's curdled, but that's because the cream cheese wasn't softened enough. It'll still taste okay!


Spread the cream cheese mixture onto the baked layer.
 

Top with the reserved crumbled topping. Then bake for approximately another 15 minutes until lightly browned!


Cool completely and cut into squares!


Yum!!!


Enjoy!!!