Showing posts with label Homemade Chocolates. Show all posts

Sunday, April 16, 2017

Homemade Chocolate Easter Bunnies!

 
Every year for Easter, my husband and I typically give flowers as gifts to our family members. This was a tradition that started with my husband's family long before I came along. I love it! We give flowers, we get flowers!

This year I decided I wanted to do something a little different, and a little more special. I made my own chocolate Easter bunnies!

Since discovering how easy it is to make your own chocolates with my Valentine's Day Raspberry Hearts, I have been obsessed. Country Kitchen had several cool rabbit molds and the second I saw them, I knew this was happening.

These homemade chocolate bunnies are super easy! Just three steps:

1. Melt the chocolate
2. Pour the chocolate
3. Freeze the chocolate

Done! That's it!

I wanted to make them extra special and package them up all fancy too, so I got edible grass and candy coated chocolate eggs to put in the bag. I also found some cute bunny ribbon at Walmart to tie it up with!

This is also my nephew's first Easter, so I wanted to make a little Easter basket for him. Even though he can't eat the chocolate bunny, I put one in his basket (for his mom and dad!) along with a plush little Peep and a book about the first Easter when Jesus rose from the tomb. I am his Godmother after all!

 Here's how I made the chocolate bunnies:

The supplies: chocolate candy coating wafers and rabbit molds!

Pour some of the chocolate wafers into a microwavable glass bowl and microwave for 30 second intervals, stirring in between. I like to work in smaller batches, it's easier to handle and just in case you mess something up, less is wasted!

After about a minute it will look like this.

It usually takes about 3 times to get all the chocolate melted.

Then all you do is pour the melted chocolate into your mold! Freeze it for about an hour, keeping it level at all times.

Take it out of the freezer and turn it upside down to release!

There you have it! A perfect chocolate bunny! It looks just like a store-bought one!

 The edible grass and candy covered eggs I got to put into the treat bag.

I love the ribbon, it looks like peeps!

My nephew's first Easter basket!

Now that I know exactly how easy these bunnies are, next time I think I may jazz it up even more and make filled rabbits or even flavored ones! The possibilities are endless!


Happy Easter!!!


Sunday, February 12, 2017

Homemade Raspberry Filled Chocolates!


Chocolate and Valentine's Day go together hand in hand. These homemade Raspberry Filled Chocolates are a great way to say "I love you" to that someone special!

These chocolates are fun and easy to make and would even be a perfect Valentine's Day activity to do together!

Start out by making a batch of my yummy raspberry sauce. I recommend making it at least a few hours prior so it has a chance to cool off before making the chocolates. Otherwise, they might explode! Okay, they'll crack, but still ~ not good!

 Here's what to do!


The supplies ~ I used milk chocolate candy coating wafers since raspberry is usually a little tart. I also chose a fairly deep heart-shaped mold to ensure that I could get a good amount of raspberry in each heart. Make sure you wash and completely dry your mold prior to adding chocolate. Water is the enemy of chocolate!

I also got these cute heart-shaped boxes to put the chocolates in!
Start by melting some (not all) of your wafers in the microwave for thirty second intervals and mixing in between each.

After the first thirty seconds. Give them a stir and pop them back in the microwave for another thirty seconds. Repeat if necessary. Mine only needed a minute.

This is what you want your chocolate to look like. Nice and melted.

Spoon enough melted chocolate into the mold cavities to fill it up and let it sit for a minute so that it starts to harden slightly around the edges.

Then pour all the chocolate out onto a plate swirling the chocolate around the hearts to get even coverage.

Your mold should look something like this. Try and scrape the excess chocolate off the mold for a clean edge around your hearts.

Don't worry ~ all that chocolate on the plate doesn't go to waste. Just reheat it for about twenty seconds and scrape it off back into your bowl of melted chocolate wafers. You'll be reusing the chocolate over for the topping and the other candies. Add more wafers if needed and re-microwave your bowl of chocolate when it gets hard.

Pop your mold into the freezer for a minute or two until your chocolate hardens and let it sit out for another few minutes to warm up a bit before filling it with the raspberry. If you add all these different temperature ingredients together your chocolates will crack.

Add enough raspberry to almost fill up the cavity, but not quite. You will need to leave room for your chocolate top.

You can immediately add the top chocolate. Try to use enough to just bring it to the top of the mold.

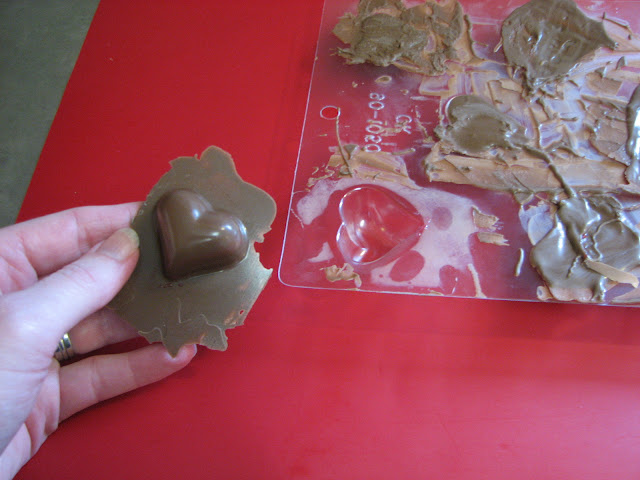
Use an offset spatula to even out the back of your chocolates and scrape any excess chocolate off and away from the heart edge to try and make the edges clean. 

I did not get all the chocolate scraped off very well on this batch and then my hearts were surrounded by a bunch of excess chocolate that I had to cut off.

This is more what it should look like.

Some of mine cracked a bit and that's okay. The raspberry didn't really leak out. This is why you should try to keep everything as even as possible temperature-wise otherwise this happens.

Most of them turned out very well! And very delicious!

All boxed up and ready to go! Four of them just fit in these little boxes. Which is perfect, since they are very rich.

This made about twenty chocolates and only took about two hours.

Happy Valentine's Day!