Showing posts with label Dinner. Show all posts

Sunday, January 7, 2018

Tomato Basil Soup


Whenever it starts to get cold, I start craving soup! So with this deep freeze going on (for what seems like forever now!) I am definitely in the mood for some warm and hearty soup!

The other day, I went to the grocery store and picked up a rather delicious looking "can" of tomato basil soup to throw in my cart. Since I am on Weight Watchers, I checked the points on my handy little WW app. HOLY CRAP! It was 28 points for two cups of this soup! That's like all I get for a whole day! I quickly put it back, perplexed as to why tomato soup would have so many points. I know it had cream in it, but still! Tomatoes are zero points!

I decided right then and there to make my own tomato basil soup, with as few points as possible! I am so thankful for my smart phone (don't laugh, I only got one recently!) because I quickly looked up a few recipes on Pinterest. Most had the same basic ingredients and I switched out or left out some of the higher point items and came up with my own recipe!

This soup is really so easy and delicious, there is no need to buy canned soup ever again! And if you're on Weight Watchers, it's only one smart point! One! And that's just for the olive oil to saute the onions in!


Ingredients:

1 28oz can crushed tomatoes 
half a large onion, chopped
1tbs olive oil
1 tsp minced garlic (I use the pre minced stuff in the jar)
1 14oz can of chicken broth
fresh basil


Here's what I did:


I started by sauteing the onions in the olive oil until golden brown over medium heat. Then I added the garlic and cooked just until fragrant (about one minute.)


Next I added in the chicken broth, tomatoes and a pinch of salt. I brought it to a boil and then turned the heat down to low and let it simmer for about 15-20 minutes.


At this point, try the soup. If it's too sour for you, you can add some sugar to sweeten it up. I recommend adding a teaspoon at a time. I liked mine without it, but some people may not.


Lastly, I added the basil. I only cut up three leaves of it because I wasn't sure if I liked basil. And the soup tasted pretty darn good without it, so I didn't want to ruin it! But, if you know that you like basil, by all means, use as much as you like!


I also used my immersion blender and blended the soup so that it would be smoother. You could use a food processor to do it, but just make sure that the soup is mostly cooled down before you do it that way. No one wants to get burned by scalding hot soup exploding out of a food processor (because it will!) Or if you're rich and have Vitamix, you can use that as well. Or, if you like chunky soup, don't blend it at all!


Yum!!!


A little basil garnish to make it pretty!


And a little shaved Parmesan cheese to make it extra yummy!


This recipe made about 3 cups of soup. 

Just remember if you are on WW, everything you add to the soup (sugar or Parmesan cheese) adds points, so adjust accordingly!


Enjoy!


Thursday, March 23, 2017

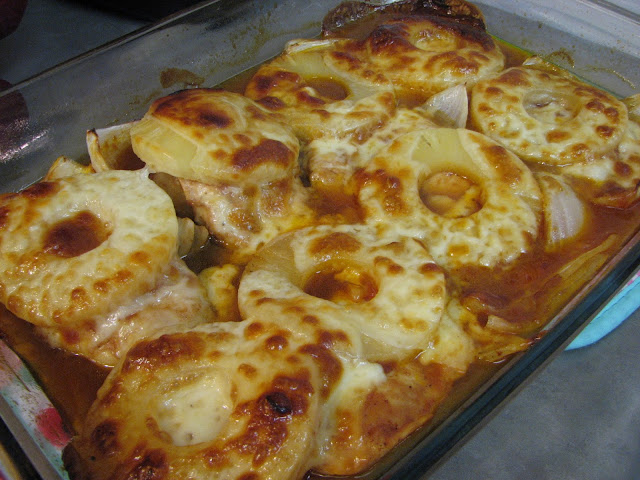
Easy Hawaiian Chicken Bake!

Weight Watchers Friendly/Easy Easter dinner

We had my in-laws over the other night again and I was wanting to try something new and impressive, but still super easy for dinner. 

Enter this Easy Hawaiian Chicken Bake!

This dish seriously could not be easier! And it's amazing! It's great for a crowd or even for a romantic dinner just for two. 

I also thought about serving it for Easter dinner since something about pineapples screams Easter to me for some unknown reason! And, you can really up your game and make it ahead of time!

This Hawaiian Chicken Bake is also very Weight Watchers friendly! (Only 8 points per serving!)

Ingredients:
(based on four to five people)

5 boneless, skinless chicken breasts
1 to 2 sweet onions, quartered
1 large can of pineapple slices
A bottle of your fave BBQ sauce
1 package of smoked provolone cheese slices


First, start by quartering your onions and place them in the bottom of a sprayed baking dish.

Place your chicken breasts on top of the onions and season with salt and pepper. These are probably the thinnest chicken breasts I have ever seen. Normally, I get thicker ones, but it all tastes the same!

Next, drizzle your chicken and onions with your favorite BBQ sauce! If you are on Weight Watchers, measure it out for the points. That Kroger Sweet n Tangy BBQ sauce in the background is one of my favorites! It's, guess what ~ sweet and tangy!

Place the pineapple rings on top of the chicken.

Then top with the provolone cheese!

Cover with foil and bake at 375 degrees for about 45 minutes or until the chicken reaches at least 165 degrees internally. After it reaches 165 degrees, take the foil off and return the chicken to the oven and cook until the cheese gets bubbly and a nice, golden brown.

Mmmmm! It is so good!

I also made an Angel Food Cake for dessert and topped it with Cool Whip Lite and fresh strawberries!

The quickest way to the hostess's heart is by bringing them flowers! Thanks, honey!


For all you Weight Watchers out there, this Hawaiian Chicken Bake is only 8 smart points per chicken breast! (The kind of bbq sauce and cheese you use will effect the exact pointage of the meal, this is just how much mine was. If you want exact points be sure to figure it out based on your options!)


Enjoy!


Tuesday, March 7, 2017

Easy and Awesome Calzones!


I fell in love with calzones after trying them for the first time at Costco a few years back. Since I don't have a membership, my chances of getting my hands on them are few and far between. My husband and I were craving those amazing calzones like crazy, so I had to do something! 

Necessity is indeed the mother of invention, and I ended up coming up with my own calzone recipe! And they are nothing short of amazing themselves, if I do say so myself!

 We've actually eaten these calzones twice this month already! They are that good! And very easy to make! I actually prefer them to a homemade pizza, and honestly, even sometimes to a restaurant pizza!

I like a cheese calzone, with a few green olives thrown in, while my husband likes pepperoni in his. Just like a pizza, you can put any toppings in them you desire. Just make sure that if you want sausage, ground beef, or chicken that it's pre-cooked and heated through before stuffing your calzone with it!

Here's what you will need:

Pizza Sauce
Jiffy Pizza Crust
Mozzarella Cheese (shredded is fine, but if you really want an amazing calzone, grate your own!)
 Toppings of your choice!

The ingredients. You can use any toppings you like, these are our favorites!

Make your pizza dough according to the directions on the box and preheat your oven to 425 degrees.

I like to put my dough on the warming area of my stove to let it rise.

Most important rule of working with pizza dough: take off your rings! Then proceed to knead on a floured surface! This dough is very sticky and will usually need several tablespoons of flour.

After kneading your dough, cut it in half and shape them into a sort of rectangle shape and place on a greased pizza pan. Try to get the shapes as even as possible so when you fold it over it matches up with the other side. And try not to tear a hole in the dough either!

Put about a tablespoon or two worth of pizza sauce on one side of the dough.

And add your cheese! Not too much, unless you are having a plain cheese one. I usually have a tendency to overfill mine, so be mindful of that.

Add your other toppings and once again, don't overfill! Less is more with these calzones!

Love me some olives!

Top with the final layer of cheese

And fold over!

Use a fork to crimp your edges

All set to go into the oven! Bake for about 10 minutes.

After about 10 minutes (or just when they are starting to brown), take the calzones out of the oven and rub them with butter!

I sprinkle a bit of garlic salt on them at this point too for some extra flavor, but that's totally optional. Stick it back into the oven for about eight more minutes or until golden brown!

Ready to eat!

My mouth is watering looking at this picture!

Look at that cheese oozing out! There's a delicious little olive peeking out!

Here's my husband's calzone, I'm not really a fan of pepperoni. I ate one too many pepperoni pizzas when I was younger!

Once you have these tasty treats, you'll be craving them again and again!


Enjoy!

Wednesday, February 8, 2017

Smoked Cheddar Cheese Souffle


Souffle.

No word in the English (or French, in this case) language evokes more fear in a home cook's heart than souffle.

A souffle is considered the holy grail of cooking. If you can make a souffle, you can make anything.

I'm gonna let you in on a little secret. 

A souffle is really not that hard to make! 

Personally, I find it a lot easier than trying to make a good fried egg!

If you are looking for a romantic meal to make for Valentine's Day, look no further than this cheese souffle for two from Real Simple!

This has been my go-to Valentine's Day meal for the past two years. This year I made it early since I had that awesome smoked cheddar cheese I got at Guggisberg in Shipshewana last month.

I thought it would be perfect in the souffle, and boy was I right! It was nothing short of amazing!
 
The cheese sauce base.

The egg whites "whipped into submission."

I use a pyrex dish coated in butter and Parmesan cheese instead of a souffle dish because that's what I have. I might try putting it into two little ramekins next time though, just for something different!

Cheese sauce all folded into the egg whites and ready for the oven. I'm not sure if all that nonsense about being quiet around a souffle is nothing more than nonsense or not, but I'm not taking any chances!

Voila! A delicious cheese souffle! It collapsed slightly after taking it out of the oven, but that doesn't affect the taste!

My mouth is watering just looking at it! Next up to try, a chocolate souffle!

Wednesday, January 25, 2017

Pot Roast for the In-Laws


Cooking for your in-laws is quite possibly the most daunting task you will ever be faced with. 

Let me make it really easy for you.

Make a pot roast.

A pot roast is a surprisingly easy meal, yet it is very elegant (and most importantly, delicious!!!)

Some people will just throw it in the crockpot and that's fine, but I prefer to cook mine in the oven. It browns the meat and that's where the flavor comes in!

A roast does take about four to five hours to cook, so make sure to prepare for that. But, if your mother-in-law is coming over you'll probably be spending the day at home cleaning anyways. Am I right?

 Once you throw a roast in the oven there's nothing else to do to it, so you can fix it and forget it!  

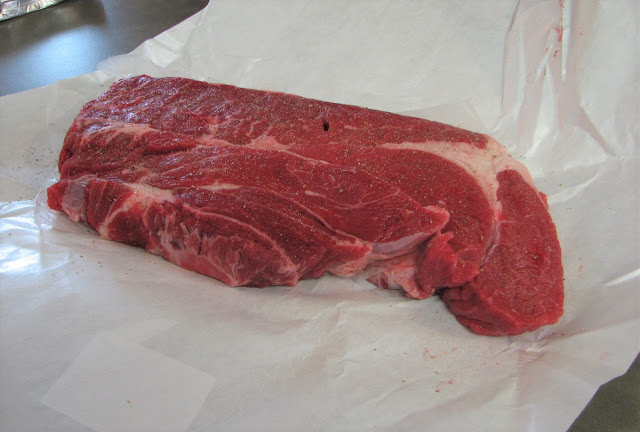
I usually get approximately 1.5 lbs of chuck roast per person. (You'll probably have a little for leftovers.) Then I season it liberally with garlic powder, salt, and pepper on both sides.
I put the roast in my French Corningware casserole dish (you could use a small roasting pan as well) and pour in a can of beef broth, filling up the dish about half way up the roast. (Make sure you spray the dish with cooking spray before placing the roast in it for easier clean up!)
At this point, I add my veggies. I usually include carrots, a giant sweet onion (that's my favorite part!), and potatoes. Today, I used red potatoes.
Just cut the potatoes in half.
I quarter the onions.
Add the onions, taters, and baby carrots to the roast. Start the oven out at 350 degrees for about an hour. Then drop the temp down to 250 degrees and cook for about three to four more hours, until the meat is fork tender and falling apart. Make sure the temp is at least 165 degrees in the middle of the roast.
Dig in!
~ ~ ~

This roast is perfect for Weight Watchers followers too. 3oz of roast are 7 smart points and the potatoes are only 2 points for half a cup! Everything else is zero points!