Showing posts with label Holiday. Show all posts

Wednesday, December 13, 2017

My Christmas Wreaths


I cannot believe that Christmas is just around the corner already! 

And I have totally been slacking on the blog! I usually post pretty much daily on my Instagram though, so if you are missing me you can check it out. It's sweethome.indiana!

Today, I am going to post all the Christmas Wreaths that I made! I actually sold most of them at my craft shows, so I am very happy about that! The few that I have left are hanging up on various doors at my house. I have one on my front door, one on the inside of my front door, and one on the inside of my backdoor! If I had a fireplace, I'd definitely have one hanging above it too!

In my home, wreaths are a necessity on my front door! It's a great and easy way to spruce up your entry way and welcome guests to your home!

I like to make unique wreaths, ones that you wouldn't normally see. Wreaths that stand out, and that people will cherish as part of their seasonal decor every year! I love all my wreaths and selling them is bittersweet because I would love to keep them all for myself! But, at the same time it makes me happy that someone else wants them as well!

You can check out my facebook page and if you are in the neighborhood you can purchase one of my wreaths or keep up with my shows! I am hoping to do a couple of craft shows in the Spring with some happy Spring and Summer wreaths!


Here are all my Christmas Wreaths, in all their glory:


Poinsettia's are probably my favorite flower! I loved this wreath and since someone already purchased it, I will have to make another one for myself!


This wreath screams vintage to me! I love everything vintage so this was one of my faves!


Santa!

Inspired by a Martha Stewart wreath, this Jingle Bell Wreath surprisingly took me several tries to get right! I had to find the right gauge of wire (I ended up using a hanger!) and of course, the perfect bow!


This is my husband's favorite wreath! We kept it and he added lights to it. It's hanging on our front door!

My brother and sister-in-law bought this wreath from me! It's classic with it's Christmasy red and green color scheme, but also modern with the green berries!


This deco mesh Poinsettia Wreath is ginormous! It does not fit on a front door with a storm door on it! I love it though! It would be perfect above a fireplace! It's currently hanging on the inside of my front door and it looks awesome!


I seriously just discovered buffalo check plaid and I love it!!! Pair it with burlap and holly and you have the perfect farmhouse Christmas wreath!


A glamorous poinsettia wreath!


Classic hydrangea. I made a very, very large one of these for above my sister-in-law's parent's fireplace. I can take orders!


I told you I loved poinsettias!


This was one of my most popular wreaths! I had to make several of them!


Everyone have a Merry Christmas!


Saturday, April 22, 2017

Late Easter Wrap Up


I have been having internet issues here lately, so please excuse the lateness of this Easter post, but I wanted to share a few things!

Last Sunday was a great day! One of our family get-togethers actually got cancelled and after we went to church, my husband and I were left to our own devices for the day. It was the best holiday ever!

We ended up going to a Mexican restaurant and having brunch. (We are always down for Mexican food ~ even in the morning!) After stuffing our bellies we went home and crashed on the couch and watched movies! I wish all holidays could be that low-key and relaxing!

If you follow my Instagram, you may have already seen some of these pictures. If you don't follow me, you should! I am obsessed with Instagram right now! It's like a mini blog and I usually post things once or twice a day. I love it!

Anyways...back to this blog!

I decided way back in January while watching an episode of Martha Bakes on PBS to make her Carrot-Ginger Cake with Orange Cream Cheese Frosting for Easter. It looked delicious wrapped in candied strips of carrots, but I had seen some super cute bunny and carrot sugar decorations at Country Kitchen that I wanted to put on it instead. I love putting my own spin on things and making it my own! It turned out so good! (And saved a few steps too!)


Getting ready to go in the oven. It was a very easy recipe ~ even for a beginner! This was my first "from scratch" cake I had ever made. And yes, I am a very messy baker. Ask my husband!

Soooo cute!!! I was very happy with the way everything turned out! A lot of times in life things don't go as planned, but this actually did! Thanks Martha!

It was delicious as well! I definitely will be making this again! I highly recommend it! Adding the ginger and the orange to this cake just takes it to a whole other level!

Another shot of my nephew's Easter basket I put together!

And this is my "Easter Basket" from my husband! I mean the Easter Bunny! He always does such a good job! I can't wait to plant it in the ground and have it come up year after year!

On an Indiana backroad heading for church! It was a beautiful day!

I really liked this stained glass at the church. I had seen it before, but on Easter it just really struck me. Maybe it was the sun shining in. I love stained glass.

We went to my husband's parent's church because his dad was in a play. He was the angel that told everyone that Jesus had risen from the tomb.

My Easter meal! It felt a bit like A Christmas Story, going to an ethnic restaurant on a holiday and all. It was delicious and I think I have found a new favorite kind of omelet ~ pico de gallo and cheese with sour cream and a squirt of lime juice! Delicious!


  Hope you all had a wonderful Easter!
 

Sunday, April 16, 2017

Homemade Chocolate Easter Bunnies!

 
Every year for Easter, my husband and I typically give flowers as gifts to our family members. This was a tradition that started with my husband's family long before I came along. I love it! We give flowers, we get flowers!

This year I decided I wanted to do something a little different, and a little more special. I made my own chocolate Easter bunnies!

Since discovering how easy it is to make your own chocolates with my Valentine's Day Raspberry Hearts, I have been obsessed. Country Kitchen had several cool rabbit molds and the second I saw them, I knew this was happening.

These homemade chocolate bunnies are super easy! Just three steps:

1. Melt the chocolate
2. Pour the chocolate
3. Freeze the chocolate

Done! That's it!

I wanted to make them extra special and package them up all fancy too, so I got edible grass and candy coated chocolate eggs to put in the bag. I also found some cute bunny ribbon at Walmart to tie it up with!

This is also my nephew's first Easter, so I wanted to make a little Easter basket for him. Even though he can't eat the chocolate bunny, I put one in his basket (for his mom and dad!) along with a plush little Peep and a book about the first Easter when Jesus rose from the tomb. I am his Godmother after all!

 Here's how I made the chocolate bunnies:

The supplies: chocolate candy coating wafers and rabbit molds!

Pour some of the chocolate wafers into a microwavable glass bowl and microwave for 30 second intervals, stirring in between. I like to work in smaller batches, it's easier to handle and just in case you mess something up, less is wasted!

After about a minute it will look like this.

It usually takes about 3 times to get all the chocolate melted.

Then all you do is pour the melted chocolate into your mold! Freeze it for about an hour, keeping it level at all times.

Take it out of the freezer and turn it upside down to release!

There you have it! A perfect chocolate bunny! It looks just like a store-bought one!

 The edible grass and candy covered eggs I got to put into the treat bag.

I love the ribbon, it looks like peeps!

My nephew's first Easter basket!

Now that I know exactly how easy these bunnies are, next time I think I may jazz it up even more and make filled rabbits or even flavored ones! The possibilities are endless!


Happy Easter!!!


Wednesday, March 29, 2017

DIY Easter Egg Wreath!


It's Easter time and Wreath Wednesday is here again! What better way to greet your guests than with this awesome Easter Egg Wreath on your front door?

 Made out of plastic Easter eggs, it is easy to make and easy on the wallet! It doesn't get much better than that!

Every door deserves a wreath! Inside and out, in my opinion. Although simple, this wreath packs a punch with it's bright colors and looks like something you would pay big bucks for at a store.

I love Easter! I think all the pretty colors are part of the reason why I love the holiday so much. Well, that and the candy! After a long, cold, and dark winter, bright pops of color and pastels are a very welcome sight!
 
Here's what you'll need:
 
 Plastic Easter Eggs (in whatever color scheme you like!)
A foam wreath
A hot glue gun

I probably used about 100 eggs. I'm all about bright rainbows of colors, but an ombre color scheme would be cool or even speckled bird eggs!
Just start gluing your eggs onto the wreath! Use a dot of hot glue on the part of the egg that will touch the wreath (generally, where the two halves meet.) You will need to hold them in place for a few minutes until the glue hardens. Try to get them as close together as you can, so as little of the wreath shows as possible. That's the toughest part of this craft!
Just keep gluing! I tried to keep all the eggs pointing the same way too.

I went as far on the sides of the wreath as I could without getting it on the backside. Speaking of the backside, I glued a pop tab to the back of the wreath in order to hang it easily!

Photo bomb!

Plastic Easter Egg Wreath DIY
Love it!


Happy Easter!


Thursday, March 23, 2017

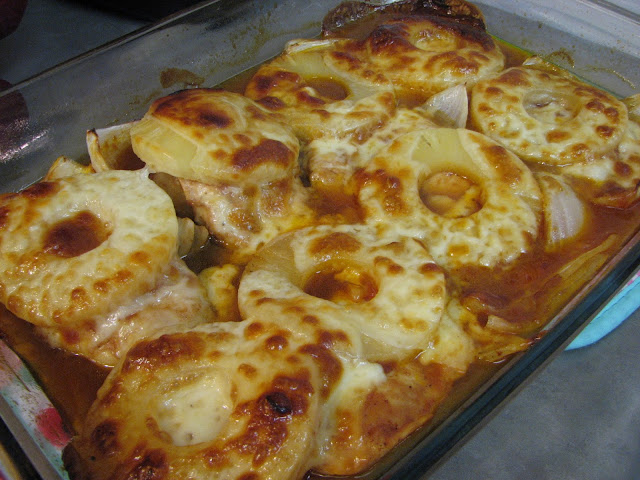
Easy Hawaiian Chicken Bake!

Weight Watchers Friendly/Easy Easter dinner

We had my in-laws over the other night again and I was wanting to try something new and impressive, but still super easy for dinner. 

Enter this Easy Hawaiian Chicken Bake!

This dish seriously could not be easier! And it's amazing! It's great for a crowd or even for a romantic dinner just for two. 

I also thought about serving it for Easter dinner since something about pineapples screams Easter to me for some unknown reason! And, you can really up your game and make it ahead of time!

This Hawaiian Chicken Bake is also very Weight Watchers friendly! (Only 8 points per serving!)

Ingredients:
(based on four to five people)

5 boneless, skinless chicken breasts
1 to 2 sweet onions, quartered
1 large can of pineapple slices
A bottle of your fave BBQ sauce
1 package of smoked provolone cheese slices


First, start by quartering your onions and place them in the bottom of a sprayed baking dish.

Place your chicken breasts on top of the onions and season with salt and pepper. These are probably the thinnest chicken breasts I have ever seen. Normally, I get thicker ones, but it all tastes the same!

Next, drizzle your chicken and onions with your favorite BBQ sauce! If you are on Weight Watchers, measure it out for the points. That Kroger Sweet n Tangy BBQ sauce in the background is one of my favorites! It's, guess what ~ sweet and tangy!

Place the pineapple rings on top of the chicken.

Then top with the provolone cheese!

Cover with foil and bake at 375 degrees for about 45 minutes or until the chicken reaches at least 165 degrees internally. After it reaches 165 degrees, take the foil off and return the chicken to the oven and cook until the cheese gets bubbly and a nice, golden brown.

Mmmmm! It is so good!

I also made an Angel Food Cake for dessert and topped it with Cool Whip Lite and fresh strawberries!

The quickest way to the hostess's heart is by bringing them flowers! Thanks, honey!


For all you Weight Watchers out there, this Hawaiian Chicken Bake is only 8 smart points per chicken breast! (The kind of bbq sauce and cheese you use will effect the exact pointage of the meal, this is just how much mine was. If you want exact points be sure to figure it out based on your options!)


Enjoy!